While many older properties without a connection to a main sewer system rely on a septic tank for sewage management, it’s no longer legal to install a new septic tank where one didn’t previously exist. If an existing septic tank discharges to a soakaway, this is no longer allowed and the soakaway must be replaced with a drainage field.
In this article, we talk about what a septic drainage field is and how to design and install one correctly.
What is a septic drainage field?
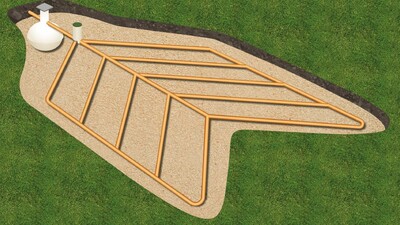
Also known as a septic drain field, leach field or foul water soakaway, a septic drainage field is a network of underground perforated pipes used to disperse the liquid effluent discharged from a septic tank. In contrast with a soakaway pit, a septic drainage field diffuses the effluent over a much wider area, exposing it to larger quantities of rainwater and soil enzymes which work together to remove impurities and contaminants.
Can a septic drainage field be sited anywhere?
For a site to be suitable for a septic drainage field it must meet several criteria.
It should be located more than 15 metres from any buildings, 50 metres from any water abstraction points and 10 metres from any watercourse.
It should also be large enough to accommodate the required size of the septic drainage field (see ‘How large does a septic drainage field need to be?’ below).
It should not be sited near trees, under driveways and other paved areas, next to a boundary, or close to other drainage fields or surface water soakaways.
It is unlikely to be permitted in an Environment Agency Groundwater Source Protection Zone, and flood risk areas should be avoided.
The porosity of the soil is also important, as is the maximum height of the water table; this can be established by carrying out a Percolation Test.
What is a Percolation Test?
We have published an excellent article on Percolation Tests, explaining what they are and how to do one, called Percolation Tests: A Guide and further information can be found in sections 1.26 to 1.44 of the Building Regulations Part H2.
How large does a septic drainage field need to be?
The surface area of a septic drainage field can be calculated using the number of people the septic tank will typically serve and the results of your percolation test.
Multiply the number of occupants in the house or building by the percolation value in seconds per millimetre taken from the results of your percolation test. Divide the result by four to reach the required surface area.
How is a septic drainage field designed?
The purpose of a septic drainage field is to create aerobic (oxygenated) contact between the liquid effluent and the subsoil of the field, by releasing the liquid effluent into the soil through perforated pipes.
The pipes are laid out in a grid that resembles the rack of an oven shelf, with a series of parallel pipes each fed directly from a distribution chamber at the top of the field and connected at the end of the field by a pipe running crossways. No length of pipe should exceed 30 metres.
An inspection chamber should be inserted between the septic tank and the drainage field.
The pipes are laid in 300 to 900 mm-wide trenches, at least 500 mm below the surface (but no more than 700 mm) and with a minimum of one metre of undisturbed ground between each trench.
The trenches should be excavated to a uniform gradient of no more than 1:200, leading away from the inlet, and lined with a 300 mm-thick bed of 20-50 mm clean shingle or broken stone.
Non-woven geotextile membrane should be used to form a barrier around the pipe to prevent silt from entering the pipe from the soil.
How is a septic drainage field constructed?
If you are installing a septic drainage field under a lawn, start by carefully cutting and rolling the turf into strips, as this can be replaced once the installation is complete.
Dig the trenches, preferably with an excavator as this will be faster and safer than manually digging them. Follow the design specifications above to ensure the spacing, depth and gradients of the trenches are correct.
Spread a layer of non-woven geotextile membrane along the trench beds for the pipe to sit on. Lay your bed of shingle or broken stone in all the trenches and check this is compacted, level and maintaining the gradients.
If you haven’t already done it, install your inspection chamber between the septic tank and the drainage field. Connect your perforated drainage pipe to the inspection chamber outlet and run it along the trenches, checking the perforations are at the bottom of the pipe and that all connections are firm.
Add a layer of clean shingle or broken stone over the pipes to a depth of 50 mm above the top of the pipe, followed by a layer of non-woven geotextile membrane.
Fill the remainder of the trench with topsoil, compacting it in layers to reduce further settling, and replace any turf.
We hope you have found this information helpful and interesting. If you have any further questions you are always welcome to call the friendly team of drainage experts at Drainfast on 01420 555600 or email [email protected].
Also, look out for more articles in our ongoing series of blog posts, bringing you useful information, insights, guides and tips on all things drainage!

Written by
Mark Chambers
Head of Marketing
As Head of Marketing, Mark plays an active role in running strategic projects to increase our brand profile.

